Welcome to the first tutorial in a series that aims to make you an expert user of Apostrophe. In this first step, we'll learn about logging in and editing your password. We'll also take a look at some of the higher-level parts of Apostrophe's interface and introduce you to some terms that we'll continue to use throughout these tutorials. If you already have a website built on Apostrophe, feel free to follow along with these tutorials using your own site, but these tutorials will specifically reference pages and functionality on our demo site which you can access at demo.apostrophenow.org.
Step 1: Logging into Apostrophe
 Now that we've arrived on the homepage, let's get to logging in. On all Apostrophe sites, you can access a login for simply by visiting http://yoursitename.com/login. In the case of our demo site, that means that you can visit http://demo.apostrophenow.org/login or simply add "/login" to the end of the URL on the homepage.
 For our demo site, you can see that the username and password are given as hints in the login window (don't worry, this is the only Apostrophe site that should do that). Go ahead and enter the username "admin" into the username field and the password "demo" into the password field. Click login and prepare to see Apostrophe's editing interface.
Step 2: Understanding the Admin Bar

After you've logged in, you'll probably first notice a floating bar at the top of your page. This is what we call the admin bar [link to glossary term]. The admin bar is your primary way of controlling information that isn't tied to any page. Things like users, events, and global settings are controlled from this bar.
To access the menus for each of these global settings or content types, simply click one of the options in the admin bar to reveal a dropdown or modal window (more on that in a bit).
Though some Apostrophe sites use a different approach, most sites have a floating admin bar that will shrink to the left as you scroll down the page. You can access the admin bar any time by clicking on the Apostrophe logo in the upper right-hand corner.
Step 3: Understanding the Page Menu
 While the admin bar let's you edit global content and settings for your site, the page menu [link to glossary term] allows you to edit specific information about the page that you are currently on.
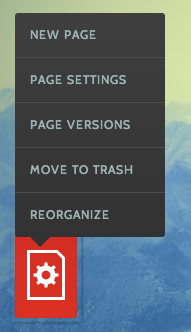
While the contents of this menu will change based on what page you're on, you will typically find buttons that allow you to:
- Add a New Page
- Mange the page's settings
- See the history of changes to your page (and revert if necessary)
- Reorganize the structure of pages on the site
- Delete the page that you're on In a later tutorial, we'll explore how to use these tools.
Step 4: Understanding Modals
 Another important piece of Apostrophe's interface that we'll be talking about is the modal [link to glossary term], which is a term we use to refer to popup windows that are used to edit information that is not a part of a page. For the most part, all content type and settings that you access from either the admin bar or the page menu will appear in a modal window.
##Pro-tip: You can close any modal by simply hitting the escape key.
Step 5: Understanding the Page's Editing Tools
 On the page itself, you will notice quite a few red buttons with icons. These buttons are your main way to add, edit, and remove content from your page. Throughout these tutorials, we'll be referring to these buttons either by the label or icon located on the button itself.